Adding hardwood flooring to your home can be a daunting task, but with the right knowledge and the right tools, it’s definitely achievable. Even if you’re a novice when it comes to DIY projects, this guide will walk you through everything you need to know to install hardwood flooring like a professional.
Here are the tools and products you’ll need before we get started:
- Hardwood Flooring (either prefinished or unfinished)
- Self-leveling compound
- Underlayment material
- Moisture barrier paper
- Circular saw/Miter saw
- Oscillating tool/Jamb saw
- Sander
- Framing square
- Chalk line
- Tapping piece and mallet
- Utility knife
- Pry bar/pull bar
- Pencil
- Level
- 3/4″ spacers
- Staple gun and staples
- Air nail gun and nails
- Flooring nailer
Step 1: Choose the hardwood and installation method
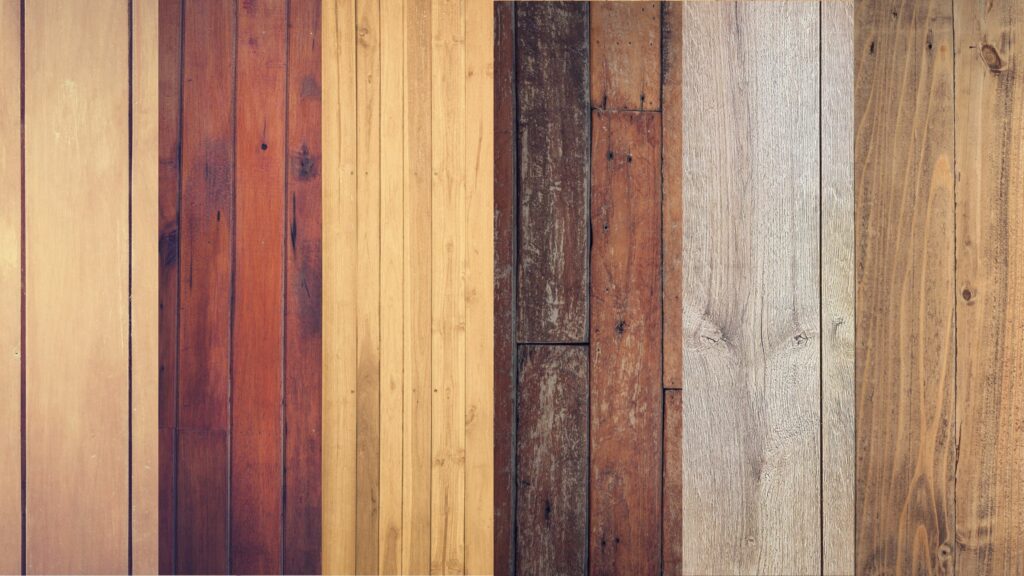
First, choose the type of hardwood you want to use. Each type has its own pros and cons so make sure you pick one that fits your needs and taste. Measure the room you want to floor to determine the amount of hardwood you’ll need. It’s always wise to order 10% more than you’ll think you’ll need to factor in possible warped boards and cutting mistakes.
Next, you’ll need to decide how to install your hardwood flooring. There are three methods for installing your hardwood floor:
The first method is glue-down installation. This can be done on both concrete and wood underfloors. Contrary to other installation methods, gluing the floors does not require an additional moisture barrier between the subfloor and the hardwood floor. A quality adhesive layer does this job already.
The biggest advantages of this method are the added stability and not being dependent on the type of subfloor. Gluing also prevents creaking. It gives the most solid feel to the floor of the three methods. However, you have more work preparing the subfloor before installation which requires more expertise. Another downside is that the adhesive used to glue the floor down can be quite expensive.
Staple or nail installation, where boards are nailed or stapled onto a plywood subfloor, is another popular installation method. The biggest advantage for homeowners is the fast and affordable installation. Another advantage of this type of installation is that you can easily replace a damaged floorboard. Do keep in mind that this can only be installed on a wooden subfloor, not directly on concrete. This method also has a small chance of creaking due to seasonal expansion, although this can generally be prevented with an underlayment of 15lbs.
The last method is a floating floor. It’s installed with interlocking grooves and requires no gluing or nailing. It can even be installed over existing floors with minimal fuss. This is ideal if you’re looking for a quick and attractive solution or when the original floor is too difficult to remove. However, this type of flooring can be noisier. The gap between the original floor and the floating floor can amplify the sound. In this gap, moisture can also accumulate causing warping or mold growth.
In this guide we opted for the traditional nail installation so from here on this will be the installation method that is discussed.
Step 2: Let the Hardwood Acclimate
Acclimation allows the wood to adapt to the different temperatures and relative humidity levels of the room where you want to place the floor. It is advised to unpack the hardwood boards and cross stack them in the room before installation. This acclimation process must take at least three days. It is primarily advised in very dry or very humid areas where the wood would dry out or absorb a lot of moisture. Hardwood floors tend to shrink or swell depending on their environment. Allowing the wood to adjust beforehand helps to minimize buckling, gapping, or cupping after installation.
Step 3: Prepare the Room for Installation
Before installing hardwood flooring, you have to prepare the room by removing existing floor coverings such as carpets, tiles, adhesive residue, etc. Make sure that the subfloor is clean and free from any debris or dirt. If there are any smelly pet stains, you should treat them with stain remover before covering them with underlayment. Check the subfloor moisture level as well and compare to your flooring manufacturer’s instructions for acceptable readings. When there is too much moisture in the underfloor you might want to get this fixed first before you put a floor on top of it.
You should also make sure that the subfloor is level. If it isn’t level, use a self-leveling compound to even out the low spots and a sander to flatten the high spots. Once this is done, lay down your moisture barrier paper on top of the subfloor. Make sure everything is covered and let it overlap. This will help protect your hardwood floor from moisture damage.
To prep the doorways, stack a piece of hardwood on a piece of underlayment in front of the door and door casings. Check if the new floor would fit underneath the door casings and if the door can open. If not, mark the casings and door with a pencil and trim the bottom side with a jamb saw or oscillating tool so the floor can fit underneath. It is good practice to trim the casings 1/16” and the door 1/8” above the floor level. Reinstall the door afterwards.
Step 4: Install Underlayment Material
The underlayment material should be applied over the moisture barrier paper before you begin laying down your floorboards. This provides further protection against moisture damage, additional sound insulation and adds a cushioning feeling under your feet for comfort. Leave the underlayment long at the ends and let them overlap roughly 6″.
Step 5: Mark the starting line
Marking the starting line square to the room walls is a crucial step to ensure that your first hardwood boards lay properly. It is best to lay the hardwood floors parallel to the longest wall, so the starting line should be parallel to the longest wall as well. Not all walls are perfectly straight, so it’s best to use the following technique:
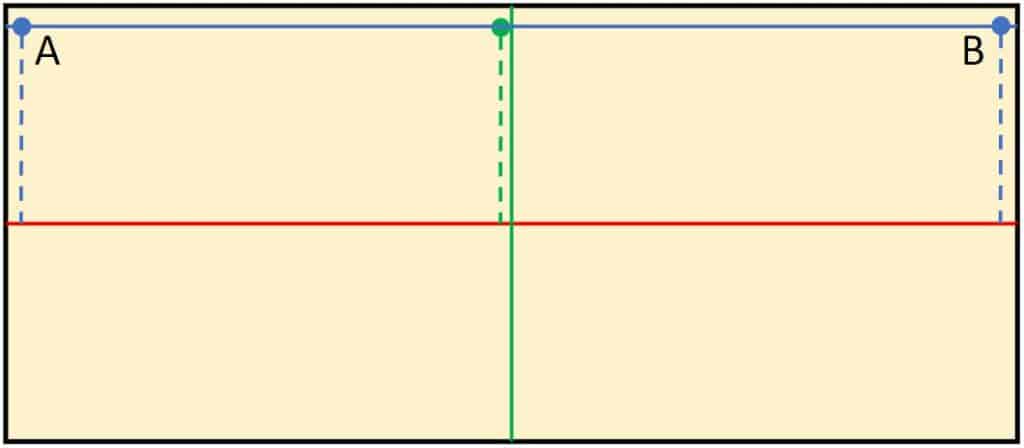
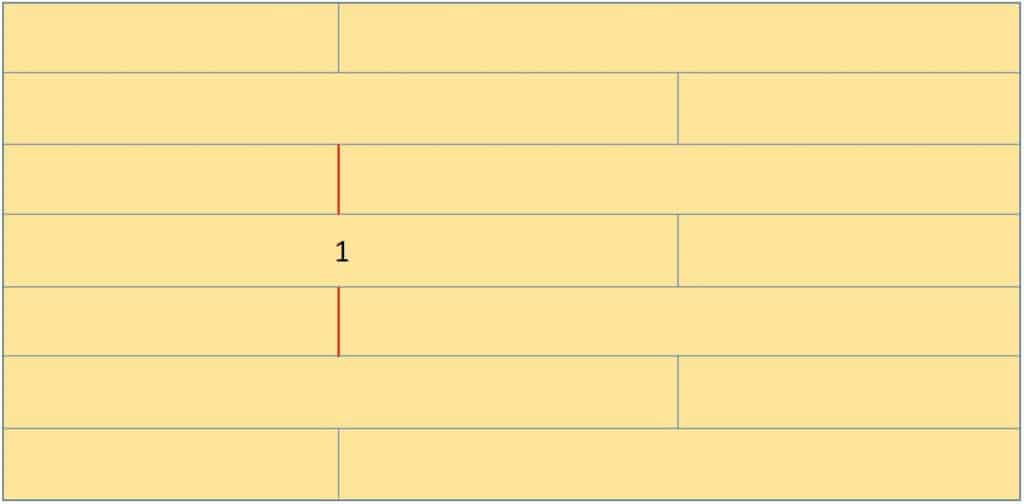
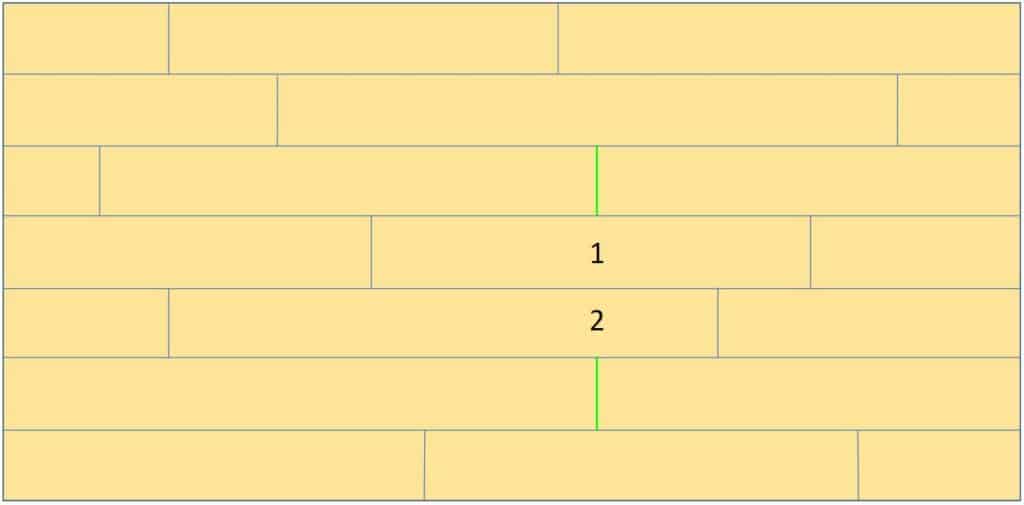
Put markings at the center of each wall and snap chalk lines between opposing wall markings (solid red and green line). Where the chalk lines cross, measure the distance from the cross to the wall you want to lay the hardwood planks parallel to. Subtract 3/4″ from that number to take into account the expansion gap. Now you have your working distance (green dotted line). Go to both ends of the wall (along the red line on the image) and mark the same distance starting from the red line. Stay 3/4″ from the walls. Now that you have your markings (dot A and dot B), you can snap a chalk line between them. This new line (full blue line in the image) is your starting line.
Step 6: Install Your Hardwood Flooring Boards
To avoid having patches of similar color and shades, mix the hardwood boards from different boxes. Mixing colors and shades gives a more natural look to your floor and makes the result visually appealing.
You don’t want to have a super thin final row of planks, so calculate how wide the last plank will be. If it is less than 1”, consider cutting the first row of planks in half.
Start by laying down planks groove side facing the wall along the starting line. Use 3/4” spacers between the boards and wall so that they have enough room for expansion caused by humidity changes throughout the year.
Face nail the board with an air nail gun about 1/2″ from the groove side. Stay 3″ away from the end and nail every 6″. When using a hammer and nail set, drill pilot holes first. Tap the next piece in place along the starting line and use a tapping piece and mallet to ensure the planks join together nicely. Nail the plank in place the same way like the previous one with either a nail gun or hammer.
Toward the end of the first row, measure the needed dimensions of the last plank and make sure to double check. Don’t forget the 3/4″ expansion gap from the wall at each end. This allows your floorboards to expand without damage when humidity in the room changes throughout the year. When you are sure of your measurements, cut it down to the right size with a miter saw or circular saw. Once all planks have been laid along the starting line, begin the next row.
Tap the planks on the next row with the tapping piece and mallet against the previous row of planks so that the tongue and groove lock together. Blind nail the board at a 45° angle just above the tongue. Continue this process for all the rows.

Editorial Staff at TwinRight is a team of experts helping its readers with product comparisons and convenient guides. Whether it's choosing the right floor cleaner, updating you on your favorite gadgets or helping you fix those annoying squeaky door hinges, we've got you covered!